
Latest Gear Live Videos
Recipe: Tomato, Chickpea, and Arugula Salad

Posted by Monica Edwards Categories: Dinner, Lunch, Side Dishes, Quick Meals, Recipes, Salad, Vegetables, Vegetarian, America,
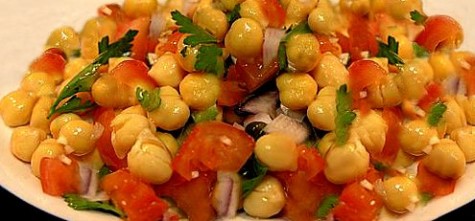
I absolutely love salads, so when I come across a new recipe, I have to share it with everyone - we all could use more veggies in our diets. This recipe is quite simple and tasty, as well as pleasing to the eye—because I am a huge believer in that we first eat with our eyes, before our mouths.
Ingredients:
- 3 ounces baby arugula
- 2 scallions, thinly sliced
- 1 15 oz. can of chickpeas, rinsed and drained
- 1 cup halved cherry tomatoes
- 1/4 cup walnuts, toasted if desired(my preference)
- 2 TB red wine vinegar
- 2 TB olive oil
- coarse salt and ground pepper to taste
Preparation:
In medium bowl, layer the first 5 ingredients and set aside. In separate tightly lidded container, combine vinegar, oil, salt, and pepper; shake until blended. Pour directly onto salad and toss.
Enjoy a fresh, quick salad.
Advertisement
Recipe: Copycat Red Lobster Biscuits

Posted by Jenny Lewis Categories: Breakfast, Side Dishes, Snacks, Comfort Food, Recipes, Cheese, Vegetarian, America, Baking,
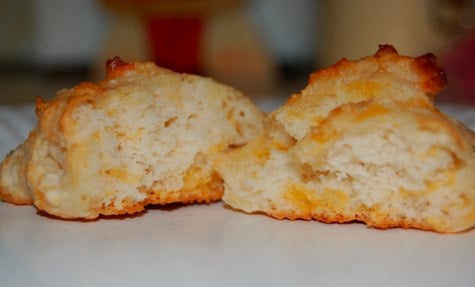
Seafood is not that big a thing around Gear Live’s virtual offices. And while I can’t speak for the other editors, I’ve been known to hit up the neighborhood Red Lobster solely for the biscuits. Unfortunately, the staff at the ol’ RL didn’t take kindly on a person who goes in alone and has nothing but biscuits, a side salad and water. That left me trying to recreate the little starchy wonders at home.
Ingredients:
- 1/4 cup margarine or butter
- 1/4 teaspoon garlic powder
- 2 cups of baking mix (I use Bisquick)
- 2/3 cup milk
- 1/2 cup shredded cheddar cheese
Click to continue reading Recipe: Copycat Red Lobster Biscuits
Recipe: Pea and Parsley Risotto
Posted by Jenny Lewis Categories: Dinner, Side Dishes, Recipes, Vegetarian,
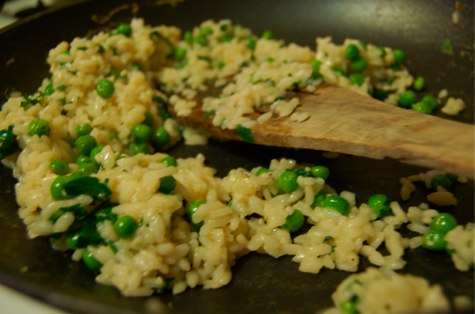
Risotto has a reputation for being tedious, laborious, and finicky. To some extent, I agree. It takes a while to prepare, you have to have your mise en place* on point, and if you’re really hungry you could end up eating your fill WHILE you’re cooking dinner. However, if you have some time and don’t mind putting up with a tired arm from all of the stirring, risotto can be one of the most satisfying meals or elegant sides you’ll ever make.
Ingredients:
- 2 T olive oil
- 1 small onion, diced
- 2 cloves garlic, minced (or 2 teaspoons minced garlic from a jar)
- Black pepper to taste
- 1 cup Arborio rice
- 2 to 3 cups chicken or vegetable broth
- 1/2 cup chopped fresh flat leaf parsley (also called Italian - this is NOT curly parsley)
- 1/2 cup frozen peas (I use petite sweet peas but any kind work)
- 1/4 to 1/2 grated Parmesan cheese (as always, fresh is best but the pre-grated stuff from the store works just as well)
Click to continue reading Recipe: Pea and Parsley Risotto
Blackberry Salad Dressing Recipe

Posted by Jenni Burns Categories: Side Dishes, Recipes, Salad, Vegetables, Vegetarian, America,

My friend Crystal is a creative cook, and she came up with this salad dressing recipe when we were over for dinner the other day. It was amazing! I was so glad when she shared the recipe with me. We enjoyed this dressed over a lush bed of greens tossed with candied pecans and dried cranberries, the salad was to die for! I plan to share a pasta recipe from Crystal later this week.
BLACKBERRY DRESSING
Ingredients:
- 2 cups blackberries
- 1 tsp vanilla
- 1/2 cup maple syrup
- 1/2 tsp onion powder
- 1 tsp salt
- 1/4 tsp pepper
- 1/2 tsp dry mustard
- 1/2 -3/4 cup olive oil
- 1/2-34 cup apple cider vinegar
Directions:
Puree, douse a bed of delicious greens, and enjoy.
Sprouting and Dehydrating Seeds and Grains
Posted by Jenni Burns Categories: How To, Grains, Vegan, Vegetarian, America, Dehydration,

Sprouting grains and seeds is easy and fun. The health benefits are well worth the extra work. You can sprout wheat berries, barley, buckwheat, alfalfa, sesame seeds, and flax seeds, to name a few. When the seed or grain sprouts, nutrients are released during the growing process that are not present in the seed or grain by itself. By sprouting, dehydrating, then grinding your grains, you are creating flour that is many times more nutrient rich than any flour you can purchase in the store. I love watching my food grow, it’s inspiring!
Step 1: Soaking
The first step is to soak the seeds or grains. Place the seeds or grains in a large pot overnight (the size of the pot depends on how much flour or sprouts you will need, keep in mind that soaking causes the grains to expand as they absorb the water).
Step 2: Rinsing
After the overnight soak, you will want to pour your grains into a colander, about half full, and rinse. When I rinse them I like to get my hands in there to mix it up to make sure that all the grains are well rinsed. Do this 2-3 times a day until the sprouts form, you want the sprout to be about 1/4 inch in length. Each seed and grain has a different germination phase. Wheat berries take around 48 hours while quinoa sprouts in as little as 12 hours.

Step 3: Dehydrating
Depending on what you are planning to use the sprouts for, you may or may not choose to dehydrate your seeds or grains. I use my sprouted wheat to make bread flour and buckwheat to make Buckwheatie Bars. Dehydrating is simple. Just give the sprouts one last rinse and place them on the dehydrating trays. It usually only takes around 4-6 hours to dry. Use your dehydrated sprouts quickly, or store in an airtight container in the refrigerator up to a month or so.
Recipe: Diced Rainbow Fruit & Veggie Salad
Posted by Monica Edwards Categories: Side Dishes, Health, Recipes, Fruit, Salad, Vegan, Vegetables, Vegetarian, America,

My husband Andru has come to the realization that a lot of the food we eat on a daily basis contains a lot of sodium. Not because I have chosen to dash everything we consume with a bit of salt here and there, but because some foods come into our home with so much added salt through processing. He was fuming about how he had chosen to purchase some soup simply because the label said “Organic” because in our mind set “organic” is supposed to mean good for you, but that is not necessarily true so he went off in a tirade after reading the label and seeing that in a one cup serving of this “good” soup there was 980 mg. of sodium, 41% of the sodium we need for the day in one cup of delicious death. He was very concerned that this percentage was in relation to an adult’s body mass, not a 3 year-olds tiny frame. How much sodium can a toddler take before a salt-induced coma? Anyway, to alleviate his worries, he is on a mission to eat more foods that are “living”, meaning less meat and processed foods and more fruits and vegetables.
In order to support his new found revelation, I decided one night to come up with a raw fruit and vegetable salad that is delicious despite not being smothered in dressing—and I aptly named it Rainbow Fruit & Veggie salad because after all was said and done, I threw in so many different colors of fruits and veggies, it became a taste sensation for the eyes. I was very tempted to add a touch of sugar to the natural dressing mixed in, but then thought, well that defeats the whole purpose, so instead added some strawberries for that touch of sweetness. Voila…a new recipe was born, and Andru loved it and the kids seemed to like it also, thank you strawberries. It is a great side dish and the recipe can be varied in so many ways, I added raw zucchini when I made it a second time and it was a hit at our Fellowship meal after church. I hope it pleases your taste buds also!
Click to continue reading Recipe: Diced Rainbow Fruit & Veggie Salad
Whole Wheat Cornbread Recipe
Posted by Jenni Burns Categories: Dinner, Side Dishes, Recipes, Grains, Vegetarian, America, Baking,

We love cornbread in our household. I liked that this recipe called for whole wheat flour. I think it makes the cornbread turn out a little less moist, and more crumbly. But definitely still wonderful - especially slathered with butter! I got the recipe right from the back of the Bob’s Red Mill cornmeal package. We ate this with some delectable Lentil Curry Vegetable Soup, yum!
Click to continue reading Whole Wheat Cornbread Recipe
Lentil Curry Vegetable Soup Recipe
Posted by Jenni Burns Categories: Dinner, Recipes, Grains, Vegan, Vegetables, Vegetarian, America,

Last year my husband and I were on a raw food kick. We bought a great book called, “The Raw Food Detox Diet” by Natalia Rose - that is where I got this recipe. My husband and I have begun a slow journey of becoming healthier people. We are trying to regain ground for ourselves at the same time as we teach our children the many benefits of eating healthy. One of the main points in this book, “The Raw Food Detox Diet,” is that we need to eat in such a way that our meals will exit our bodies in a timely manner. But equally important, we want our food to give our bodies the maximum amount of nutrients possible. One of the ways we can do this is by not eating starchy foods and meats together as they take much longer to digest when eaten together. This recipe is a great, “quick exit meal,” not raw, but definitely a great source of nutrition and it tastes great. I will be sharing more thoughts about this book in later entries, so look forward to hearing more from me on the subject of the Raw Food Diet.
Click to continue reading Lentil Curry Vegetable Soup Recipe
BBQ Tofu Recipe
Posted by Monica Edwards Categories: Dinner, Features, Recipes, Vegan, Vegetarian, America, Baking, Barbecuing,

This recipe was passed to me from a friend who has been a vegetarian all her life. So, needless to say, she has an arsenal of delicious veggie recipes that I have gleaned to add to the eclectic bunch that I rotate throughout the week. I love this particular recipe for tofu because everyone (including my kids) who has tried it, loves it. And it makes tofu taste like you would never believe. It has a few ingredients that one might seem would not be paired together but all of the flavors blend so well and it is a recipe to be tried on the naysayers of tofu. It is a meal that needs an extra day to prep, but it is so easy and foolproof. It is a healthy, protein packed meal that you will feel good about feeding to your kids. Serve it on top of white or better yet, brown rice; I like to add a green vegetable on the side to add that bit of color to please the eyes as well as the palate. I usually go with broccoli or green beans, but also love asparagus lightly sauteed with some olive oil and kosher salt and freshly ground pepper.
Click to continue reading BBQ Tofu Recipe
Sugar Free Crockpot Applesauce Recipe
Posted by Jenni Burns Categories: Side Dishes, Snacks, Recipes, Fruit, Organic, Vegan, Vegetarian, America, Slow Cooking,

I love this time of the year, when the weather starts to turn a little colder, and forces us indoors. I love the changing of seasons - it makes me feel creative, as there are so many different fresh food options with each season. In Washington, August through October is the season of bountiful apples, pears, plums, peaches, nectarines, and many other tree ripening fruits. I think that many people buy applesauce because, it’s less expensive at the stores, but even more than that, they don’t realize how easy it can be to make yourself. If you have apple farmers in your area, take a family trip and buy a box or two of apples, I think you will be surprised how much you will spend. The farmers in this area charge around $.40 a pound for seconds (perfectly edible apples that don’t look perfect so they can’t sell them in the stores, which are perfect for saucing). I love making applesauce because it makes the house smell delicious all day long. When I first started making applesauce a few years ago I had tried different recipes that all called for sugar. Every time I made the sauce I added less sugar until I realized, it doesn’t need any! This is such a simple recipe and such great apple flavor. I try to make it a fun event for the kids as well, they get to help me sauce the cooked apples and of course they get to taste the fruits of our labor!
CROCKPOT APPLESAUCE
Ingredients:
- As many apples as you can fit in your Crockpot, quartered (the best sauce is made of 2-3 different kinds of apples, varying in sweetness)
- 1/4 cup water
- Dash of cinnamon to taste
Directions:
- Wash and quarter apples, place in Crockpot.
- Add water and cinnamon. Cover and let cook on low for 8-10 hours or high for 5-6 hours.
- Towards the end I lift the lid and mash up a bit with a potato masher, that way I can see if it’s ready or not. It’s ready when the apples are very soft and mash easily with the masher, if there are still big chunks you need to cook the apples longer.
- When the apples are ready, ladle the cooked apples into a food mill and sauce the apples, leaving behind the apple peels and seeds. If you don’t have a food mill you can peel and core the apples and mash with a potato masher for a little chunkier sauce, but very pretty. Be creative with this, if you like more seasoning you can add some allspice or nutmeg, some people like to add sugar and lemon juice, I prefer less sugar.
- I always freeze my applesauce, it’s so easy. I just ladle the applesauce into quart freezer Ziplock bags and label, that’s it! You can thaw in the refrigerator or in warm water if you need it to thaw more quickly, then place the sauce in a jar (or freeze it right in the jar, leaving a 1/2 inch of room at the top for expansion.
Advertisement
© Gear Live Media, LLC. 2007 – User-posted content, unless source is quoted, is licensed under a Creative Commons Public Domain License. Gear Live graphics, logos, designs, page headers, button icons, videos, articles, blogs, forums, scripts and other service names are the trademarks of Gear Live Inc.